Saturday, September 11, 2010

Lemon Gem Cupcakes

Warning: For Lemon Lovers Only

I promise this wont turn into a cupcake blog (that trend isn’t gonna stick around for long). There’s way too much fun to be had in the kitchen to waste it on cupcakes or being vegan all the time. Yes, as an exercise in discipline I’ve been trying out a vegan diet. I’m trying to keep it interesting, and many vegans will tell you that they’ve been “opened up to a whole new world of taste!”, and I’m sure if one were to have completely unlimited resources then that is surely the case, but I am not one of those lucky people. It’s somewhat stringent, but I really did enjoy the pine nut based variation on alfredo sauce I made with my lovely friend Tracey this week. And THESE, these adorable babycakes could fool just about anybody. They are super lemony, and the icing (which is more like a glaze) is kind of unwieldy, but they are very tasty and make it look like I know what I’m doing!

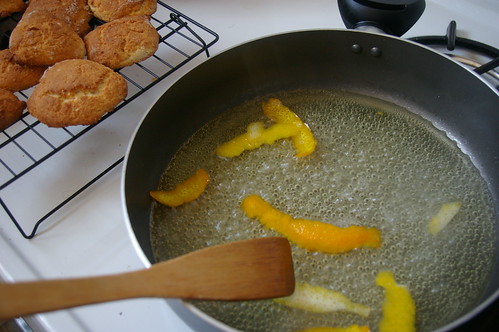
The only part of this recipe that required a little bit of doing was the sifting and the zesting. MAKE SURE YOU HAVE ENOUGH LEMONS and you don't have to go back to the store like me. Zesting is one of those things that I haven't completely figured out the secret to yet, I'm sure Alton Brown has some secret method that will make my life a lot easier. I will update if I can find it! I have a pretty cool zester, but a clean metal file (like you would find in a wood shop/garage/home depot) works. Some box graters have a zesting side- you know, the one you always accidentally cut yourself on!
These are very pretty cupcakes, nice and moist and glowy.

Adapted from Isa Chandara Moscowitz
Lemon Gem Cupcakes

For the cupcakes:
1 1/3 cups all-purpose flower
1/2 teaspoon baking powder
3/4 teaspoon baking soda
1/4 teaspoon salt
1/4 cup canola oil
2/3 cup plus 2 tablespoons sugar
1 cup rice milk
1 teaspoon vanilla extract
1/4 cup lemon juice
1 tablespoon lemon zest

For the frosting:
1/4 cup non-hydrogenated soy margarine, softened*
1/4 cup soy milk
2 tablespoons lemon juice
2 cups confectioners sugar, sifted**

*A note on soy margarine: Obviously, you don't have to make this recipe vegan, I just chose to for experimental purposes. I used Earth Balance buttery sticks and they worked just fine.

**A note on sifting: I know, it's kind of a pain, but this extra step will ensure that your cakes or whatever you are making has a smooth and fluffy texture. Sifting not only works out any lumps that may be hiding in your dry ingredients, it also aerates the flour/sugar/etc. so that it incorporates into the recipe better and comes out fluffier.

Preheat the oven to 350 degrees. Line a twelve-muffin tin with paper liners. Sift together the flour, baking soda, and salt. In a separate bowl (I just put it straight into the Kitchenaid) combine the oil, sugar, rice milk, vanilla, lemon juice, and lemon zest. Once the wet ingredients are well incorporated, pour in the dry ingredients and mix until smooth. The recipe said to fill each cupcake liner about 2/3 full but I found that I had a lot of leftover batter- I'd go for about 3/4 full.

Bake for 17-20 minutes. Even though I have a mad-hot gas oven, these took awhile to get done. I checked them at 18 minutes but ended up putting them back in for another four. Look for a slight browning on the top, and give them time to cook through so the bottoms aren't too dense and soggy. Once they are cool enough to touch, let them cool on a rack and DO NOT FROST until they are completely cooled.

While they are in the oven, go ahead and make the frosting. Or make it beforehand, whatever. I found that this frosting recipe yielded a lot more than I needed, so if anyone can think of something to do with a bunch of lemon frosting I'm up for ideas.

Whisk the margarine until fluffy- I also did this in the Kitchenaid and I would recommend using either a stand or a hand mixer so you can get the right consistency. Stir in the soy milk and lemon juice, add the confectioners sugar and mix until smooth. Keep working with it until it feels right. I added sprinkles for a little visual interest.

Just be patient, be careful, and be open minded to vegan baking once in awhile!

Enjoy!

Saturday, August 28, 2010

Carrot Cake Cupcakes & Gig Posters

The last few days have been a constant stream of creative JUICE! Which is great because I have felt a little blocked lately. Maybe it was having Moonage Daydream stuck in my head, maybe it's because I had the opportunity to dance away the stress a few times this past week (with my good friend Santa!)
I am a big fan of carrot cake, and I might have a hard time fully trusting someone who is actually opposed to it. The great thing about this recipe is that it has no raisins, although it wouldn't hurt to add them. It makes them a little more fun, plus I think it would be pretty easy to convert this into a vegan recipe. (Don't act all bummed out, there's nothing wrong with trying to cut out eggs and cheese once in awhile!) These really are ridiculously good, I made them for a gallery opening last november and someone came up to me with half a mouth-full and described them as "LIKE, THE BEST THING I'VE EVER PUT IN MY MOUTH!!" These are incredibly easy to make, and there's not too much icing so the cake can really speak for itself. I'm sure you will get the same response!

Before I get to the recipe, I would like to mention that I have been able to do some really fun design and illustration lately, so if you like what you see and you have a need for it, let me know! One of my oldest dearest Nashville friends asked me to do this gig poster a few days ago, and for making this happen in such a short amount of time- I'm not disappointed in myself. To check out the line up for the show you can click here.
In other news, please send good thoughts/energy/what-have-you my way, I really need a job and I'm trying to stay super positive about it!

For the Carrot Cake, Serves 12 (This recipe doubles beautifully if necessary):
1 1/4 cups shredded coconut (I always end up having leftover, and I prefer unsweetened)
1 cup sugar
1/3 cup vegetable oil, plus more for pan if needed
2 tablespoons fresh orange juice
1/2 teaspoon vanilla extract
2 large eggs
1 teaspoon baking powder
1/2 teaspoon baking soda
1/2 teaspoon ground allspice
1/2 teaspoon salt
3/4 cup plus 2 tablespoons flour
1 1/2 cups shredded carrots
1/2 cup chopped walnuts

For the Cream Cheese Icing:
8 oz cream cheese at room temperature
3/4 cup confectioners sugar
1/4 teaspoon vanilla extract

Preheat the oven to 350 degrees F, spread 1 cup of the shredded coconut out on a baking sheet and toast in the oven until golden brown, about five minutes. DON'T FORGET, this stuff will burn so fast. Transfer to a small bowl and set aside to cool.

In a bowl (or a stand mixer, thats what I did) combine the sugar, 1/3 cup oil, orange juice, vanilla, and eggs. Mix in baking soda, baking powder, allspice, and salt. Add the flour, mix, then add the shredded carrots, walnuts, and the remaining 1/4 cup shredded coconut.

I had some muffin tins at some point during college, but I think an old roommate ended up with them; that's ok though, she would leave the gas oven on... I think she was trying to kill me so I'll take my life over my muffin tins. The point is, you can get 3 packs of aluminum muffin tins -liners included- at most grocery stores, and if they're not too caked after ward they are totally reusable. They're usually between $2-$4. Also, if you can find them, get the silvery cupcake liners. They hold up extremely well and they look sooooo good.

So, oil your pan or divvy out your liners and start filling them with batter. They should be about 2/3 full each, otherwise you will have total cupcake overflow and a burnt mess in your oven, and your smoke alarm will probably start screeching (and if you don't have a smoke alarm, shame on you). I always try to put less in than I think is necessary and then go back over the tops with the leftover batter, just to make sure I'm not overdoing it.

Bake the cupcakes until a toothpick stuck in the middle comes out clean, about 25 minutes depending on your oven. Let them cool completely on a rack if you've got one before icing them.

While the cake-lets are baking, whisk the cream cheese, sugar, and vanilla together until smooth by hand or in an electric mixer. Only spread it on the cupcakes at room temperature, otherwise they will fall apart. Store in an airtight container for up to a week. Garnish the cupcakes with the toasted coconut.

Enjoy!

Sunday, August 22, 2010

Almond Apricot Chicken with Mint Pesto

I don't have many pictures this week! Nashville has been really stormy lately (i.e. getting dark inconveniently early) so most of the shots I took were so dark that they weren't even worth editing. Either way, I had a good time making this. Kitchen therapy is the new black.
Have I mentioned lately how much fun I've been having? Well, good times merit mentioning again, so there it is. I am having a blast. If you happened to see me at Tomato Fest last weekend on stage at the red head contest, I meant every word!

I have considered changing the name of this blog to "1,000 things to do with chicken breast and other things Martha Stewart has taught me" but that's not nearly as easy to remember. Yes, I do have another chicken recipe, they're just so photogenic! Plus, it's something I can buy in bulk cheaply and it's a more healthy option than many things. The pesto starts to oxidize pretty much the moment it is out, but I promise it tastes really fresh and light. This recipe pairs some unexpected flavors, and it's not something I can imagine becoming a classic, but if you are in the mood for a light, fresh and almost Mediterranean flavor, give this one a shot.

Adapted from Martha Stewart

For the chicken:
4 boneless, skinless chicken breast halves
1/2 cup sliced almonds (always good to have around anyway to liven up a salad etc.)
2 ounces goat cheese
4 dried apricots, cut into 1/4 inch cubes
coarse salt & ground black pepper
1/3 cup plain breadcrumbs (also good to have around)
1 large egg, lightly beaten

For the mint pesto:
3 cups lightly packed fresh mint*
1/4 cup sliced almonds
1/2 cup extra-virgin olive oil
coarse salt

*Two things: It just occurred to me that I completely forgot to salt the pesto, but it still tasted great, and who needs extra salt in their diet anyway? So, consider the salt optional. Also, I did not have quite enough mint, so I just eyeballed the amount of almonds I used and added olive oil very conservatively until the texture was right. Remember you can always add but can never subtract!

Preheat the oven to 375 degrees F. Cut a slit in each breast (being careful not to cut through completely to the otherside) to create a pocket about 4 inches long.

In a small bowl, combine 1/4 cup of the almonds with the goat cheese and apricots. Stuff each breast with the one quarter of the mixture. Season the breasts with salt and pepper all over.

On a plate, combine the breadcrumbs and the remaining 1/4 cup almonds. Dip or brush each breast with the beaten egg, then dredge in the mixture. Make sure you get the sides!

Heat the oil in a large ovenproof (hah, wish I had one!) non-stick skillet over medium heat. Cook the chicken until golden, 3 to 4 minutes on each side. Remember, this is the only chance you will have to make it look good, and it will have a chance to cook through in the oven so just worry about nice pretty browning. Transfer the chicken to the oven and bake until cooked through, about 15 minutes. Meanwhile, make the pesto.

In a food processor (or blender, whatever ya got), combine the mint which you have thoroughly washed with the almonds and process until finely chopped.

Add the olive oil gradually, and season with the salt if you're using it. Keep it at room temperature until ready to use, it will last in the fridge for up to two weeks, just make sure you let it get to room temperature before serving it so you can taste all the lovely minty-ness.

Serve the chicken hot with the pesto. Enjoy!

Tuesday, August 10, 2010

Freelancing Extraordinaire!

Let me start off by saying that I have some GOOD FRIENDS who are so willing to HELP ME OUT! Thank you to everyone who has been getting my name and my portfolio out there, I am a lucky girl, and this is an amazing city to be in! I have had an influx of freelance work lately, and it is fun and scary and challenging all at the same time. I am also still applying for steady work all over the place.
Lately I have been working with East Side Manor Productions designing brochures and cards, doing a little photography, and helping them to market and promote their events. They have a beautiful house located in East Nashville that is being turned into a venue for parties, writers nights, and this month: cooking classes!
Perfect place for me, right? So this week I created a brochure for them promoting small classes with Chef John McNeil, a brilliant individual who has cooked at Emeril's, Commander's Palace, and New Zealand's famous Logan Brown restaurant. This months class will be focused on Creole Cooking (!!!) and it will take place at 7pm on August 12th. You'll be in East Nash anyway for Tomato Festival, so why not take a break from the heat and have some lovely gourmet food in a relaxed elegant environment? The class will cost $40 per person, and all ingredients (that means you get to eat dinner), wine (that means you get to drink WITH dinner) and utensils (that means you get to help with dinner) will be provided. You will also receive a copy of all recipes, as well as any photography taken during the class. Guess who gets to help with the photography?

Hint: Red & Extraordinary

I hope I have made this sound enticing, because it is going to be a really special and lovely event. John prefers to work with a small class size, 14 is his maximum in fact, so you are assured a laid back time. Please consider attending, and if you are interested contact Rossana@EastSideManorProductions.com

Now, off to continue the job search!
-E

Tuesday, August 3, 2010

Because it's supposed to be food AND design...

Oh, hello! It's been awhile...
Here are a few examples of what I've been working on lately. I created this book jacket for a project where the only requirement we really had was that it had to be informational and 'about tea'. As you may have guessed, I love cookbooks! I went with a culinary approach to the assignment, and I must say it was one of my favorite projects in college.
I have been using these business cards lately and defining them as "1950's Kitchen Kitsch". Type and I have not always had a great relationship, but we're working on it.

I have been applying for many jobs lately, and going to a couple of interviews. Once I get my schedule a little more streamlined I hope to update more consistently. Thanks for your patience!

More on food & design soon!
-E

Wednesday, May 26, 2010

Strawberry Rhubarb Shortcake

...At least that is the short version of the title. The real title would be something like "shortcake pieces with macerated strawberries, rhubarb compote, and vanilla whipped cream". I thought the shortened version would be equally as appetizing. (I will get a better picture of this if I have any left later!) I have been so excited for rhubarb lately. I must confess, I have never actually had it! I know! I'm from the south and everything!

Anyway, I made this for a party I should be attending in an hour or so, and I am really looking forward to people's reactions to this. Even though there were a lot of steps to this recipe, it was entirely worth it and really not too laborious. I haven't had much time to cook lately, either (and have been living off the leftovers from graduation), so I found this really relaxing and enjoyable. Plus, there are so many variations one could apply to these recipes that you are bound to turn out with something good.

I will keep this short and sweet, I’m having too good of a time to sit in front of the computer right now, I hope you enjoy this recipe!


Shortcakes


2 1/2 cups all purpose flour (leveled carefully), plus more for dusting

1/3 cup cold unsalted butter, cut into small pieces

1/3 cup plus 1 tablespoon sugar (used at separate times)

2 1/2 teaspoons baking powder

1 teaspoon salt

1 cup milk


Rhubarb Compote


2 1/4 pounds rhubarb

1 cup plus 2 tablespoons sugar

1/2 cup water

3 strips (each 2 1/2 by 1/2 inch) orange zest

3 strips (each 2 1/2 by 1/2 inch) lemon zest

1/4 teaspoon course salt


Macerated Strawberries


1 pint fresh strawberries, hulled (large berries like I used should be halved or quartered lengthwise)

2 tablespoons sugar

1 teaspoon fresh lemon juice


Whipped Cream (I doubled the amounts you see here)


1 cup heavy cream

1 tablespoon confectioners' sugar

1/2 teaspoon pure vanilla extract


Prepare the Shortcake:


Preheat the oven to 425. The recipe I used called for a food processor, and I only have a mini, so I used a combination of my kitchen aid and immersion blender. So just get this step done the best way you know how, even a fork would work in a pinch. Combine the flour, butter, salt, 1/3 cup sugar, baking powder, and salt. Process until the mixture looks like a coarse meal. Add the milk, pulse your mixing apparatus four or five times, do not over do it, you just want it to be moist.


Turn out the dough onto a floured surface and with floured hands, shape it into 4 x 8 inch rectangle. This is a REALLY sticky dough so flouring your hands is important.


Dust a large knife with flour, I found this kind of difficult, maybe wetting it first next time would be the ticket. Cut the dough into 8 squares. Transfer the cakes to a baking sheet and sprinkle them with the remaining tablespoon sugar. Bake until golden. I set my timer for 25 minutes and it was probably five minutes too long, so really keep an eye on these. I thought they were a little too hard so I grated off some of the burned parts and cut them up into quarters for serving.


Meanwhile, prepare the fruit:


Go ahead and stick the bowl you will be using for the whipped cream in the freezer or fridge.


For the macerated strawberries, all you need to do is hull them (meaning remove their stems and of course wash them) and cut them up to the size of your choice. I quartered mine lengthwise because they were so large. Then toss them with the sugar and lemon juice and leave them at room temperature for at least 20 minutes. How easy is that? The sugar draws out the berry's natural juices, and the lemon gives it a little extra kick. So simple, so tasty.


The rhubarb is a little more time consuming but so worth it. I was so excited about it! It gets a little dirtier than your average fruit so it's a good idea to wash it and wipe it down with a paper towel. Cut the rhubarb using a diagonal cut crosswise in one inch pieces.


Bring the sugar, water, zests, and salt to a boil in a large straight sided skillet, stirring until the sugar is dissolved. Add the rhubarb and stir to coat. It may look like there is not enough liquid to cover, but the fruit will release it's own juices as it is cooked. Cover, and cook on medium low heat until the rhubarb is just tender, you want it to hold it's shape. Mine took about seven or eight minutes. Remove from the heat and allow the compote to cool for one hour before you use it. Sugar gets ridiculously hot.


Finally, the whipped cream:


Growing up, I never worried about the bowl chilling, and still always had yummy whipped cream on thanksgiving, but I really think it cut my preparation time in half. Oh, having a snazzy green apple colored Kitchen Aid doesn't hurt either. I used the whisk attachment and it worked beautifully- so will an electric hand mixer, but with a stand mixer you can just walk away for a few minutes. Glorious. Beat the whipping cream until you get soft peaks, then gently ad the sugar and vanilla. You don't want to crush all those air bubbles you worked so hard for (or not). Return to whipping until the soft peaks form again.


Combine all the elements in whatever manner you see fit, my favorite was in a bowl sort of like a trifle. So good, and so pretty. Enjoy!


Tuesday, May 11, 2010

Birthday-pants Extraordinaire!

I know i have been on somewhat of a hiatus, and that makes me sad because I would love to be able to cook all the time! Those finals won't take themselves! Be back soon :)